

How To Install Vmware Esxi 5.5 From Usb
After some fourth dimension using VMWare Workstation as a playground for my VM domicile lab environment, and after learning and testing with VM ESXi Hosts, I decided that is time to movement to a hardware lab.
So I achieved, for the start, 2 servers for the ESXi hosts, and because there is no HDD on the servers, I have installed the ESXi software on an USB Stick. For the storage I would like to use a dedicated shared server, but I am however looking what server and drives should I go. I need more time to check and meet what would exist the all-time solution for me.
But in the aforementioned time, I am not having enough patience to wait till I build my storage server, I would like to kickoff testing the ESXi hosts right away. I know that this is a compromise solution, but I thought to attach a USB Disk as VMFS Datastore.
So in today's postal service I would like to show you how can we add and configure a USB Disk as VMFS Datastore.
Note
Please note that in the ESXi half-dozen.vii version, USB devices larger than 2TB are not supported.
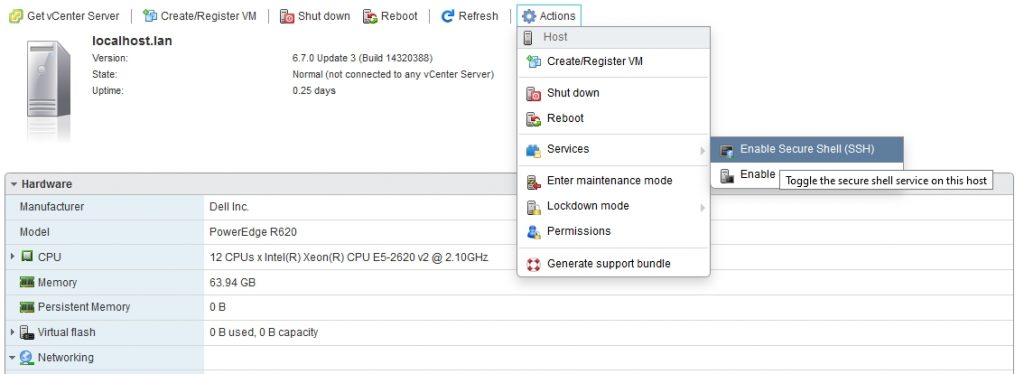
Pace one – Enable SSH access to ESXi host
Connect to ESXi IP address, go to Deportment and and so select Services and Enable Secure Beat (SSH).
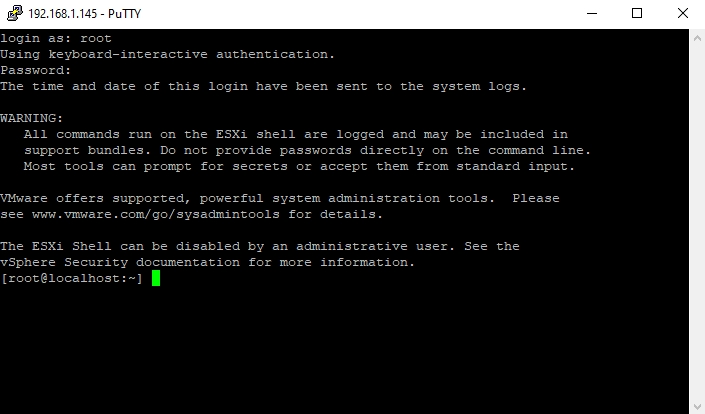
Stride ii – Connect to ESXi host using SSH
With your preferred SSH customer, mine is Putty, first a connectedness to the ESXi host.
Step three – Terminate USB Arbitrator
You have to stop USB Arbitrator Service. The service is used to passthrough the USB devices from hosts to a virtual machine. One time stopped, y'all will not be able anymore to passthrough USB devices to VMs.
# /etc/init.d/usbarbitrator end
To maintain the stopped status of the service after reboot, insert the control:
# chkconfig usbarbitrator off
Pace iv – Plug in the USB device to the ESXi host and get the device identifier
Connect USB device to the ESXi host. Then go the device identifier by issuing the following command in Putty:
# ls /dev/disks/
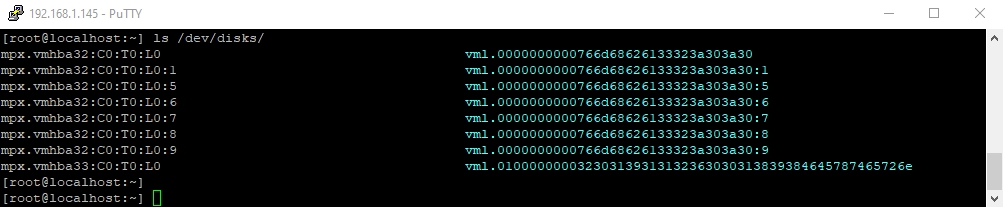
First USB device is the stick which is booting the ESXi software, so the second device is the USB Deejay that we'd like to use for the datastore – mpx.vmhba33:C0:T0:L0
Step v – Write a label to the device
Write a gpt label to the USB device using its ID
# partedUtil mklabel /dev/disks/<deviceID> gpt
Footstep six – Create sectionalisation
In society to create the partitioning, we need to take a few info:
1. The commencement sector: 2048
2. The GUID for VMFS: AA31E02A400F11DB9590000C2911D1B8
3. The finish sector. This one should be calculated.
To summate the end sector, we'll issue the following command first:
# partedUtil getptbl /dev/disks/<deviceID>

Utilize this formula to become the end Sector:
243201 * 255 * 63 – one = 3907024064
Or yous tin can apply this formula:
# eval expr $(partedUtil getptbl /dev/disks/<deviceID> | tail -i | awk '{print $1 " \\* " $ii " \\* " $3}') - 1 
Now we take all the info and we tin can create the partition using the command:
# partedUtil setptbl /dev/disks/<deviceID> gpt "one 2048 <endSector> AA31E02A400F11DB9590000C2911D1B8 0"

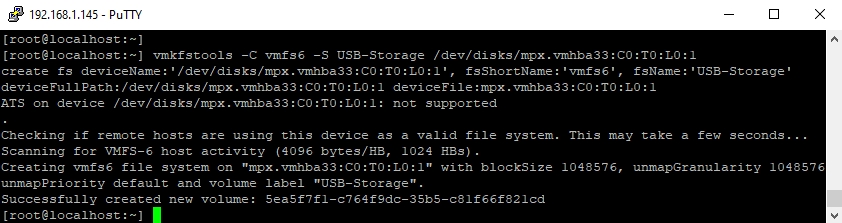
Stride 7 – Format partition with VMFS6
We'll format the sectionalisation at present with VMFS6. Please be aware that nosotros have ":1" after the deviceID.
# vmkfstools -C vmfs6 -Southward USB-Storage /dev/disks/<deviceID>:i
Step eight – Bank check Datastore in ESXi
Render to ESXi and check the Storage tab. You should see here the new Datastore.
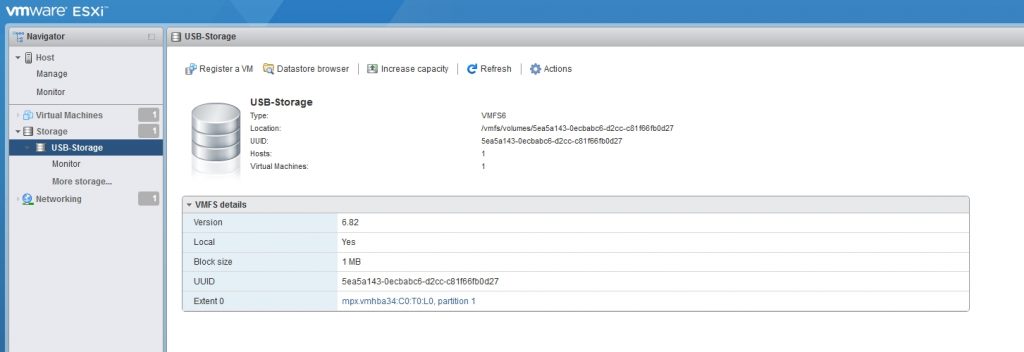
We accept managed to add the USB-Disk as VMFS Datstore and we can at present deploy VMs on it. I will proceed with the installation of vCenter Apparatus.
Source

Source: https://www.it-react.com/index.php/2020/04/26/how-to-add-a-usb-disk-as-vmfs-datastore-in-esxi-6-7/
Posted by: browntherinchis1999.blogspot.com
0 Response to "How To Install Vmware Esxi 5.5 From Usb"
Post a Comment